The Contact Us page is a very important page for a blog or website. You can find this page on most blogs. However, Contact Us on each blog can be different in its mention. Some call it Contact, Contact Form, Contact Us, and other names. With this page, visitors can easily contact the blog owner.
Actually in every blog post there is already a comment column that can be used to contact the blog owner. However, these comments only appear on commented posts. In contrast to post comments, other messages sent through the Contact Us page are usually sent to the blog owner's email. Especially Contact Us which is discussed in this article.
In addition to making it easier for visitors to contact the blog owner, the Contact Us page is also a requirement that must exist on a blog in addition to the Privacy Policy and Disclaimer pages so that the blog can be accepted by Google Adsense. I don't know if this information is true or not, but it is highly recommended to have this page on your blog.
There are two ways that you can apply to create Contact Us on your blog, especially for blogger users, namely how to make Contact Us in the form of a page like the Privacy Policy page and how to create a Contact Us in the form of a widget like the latest post widget.
How to Make a Cool Contact Us Page on Blogger
The Contact Us page is a page that can be used by visitors to contact the blog owner. The appearance of this page can vary depending on how the blog owner designed it. Starting from the simple, to the cool looking.
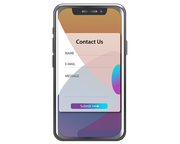
Well, the Contact Us page that will explain how to make it here is a page in the form of a Contact Form. This type of Contact Us is widely applied by blog owners. In addition to its very practical use, the appearance of this Contact Form is quite simple. You can see it on the Contact page of this blog.
How? Are you interested in making one? Here's how to create a Contact Us page in the form of a Contact Form in blogger.
1. Go to blogger dashboard.
2. Go to the Pages menu .
3. Create a new page. The way is like you create a new post.
4. Enter the title as you wish, as described above.
5. Change the view to HTML View.
6. Copy and paste the following code into the previous page.
<div class="contact-form-widget"> <form name="contact-form"> <span class="ctitles">Name :</span> <input class="contact-form-name" id=" ContactForm1_contact-form-name" name="name" type="text" value="" /> <span class="ctitles">Email Address <span class="required">*</span> :</span> <input class="contact-form-email" id="ContactForm1_contact-form-email" name="email" type="text" value="" /> <span class="ctitles">Message Body <span class= "required">*</span> :</span> <textarea class="contact-form-email-message" id="ContactForm1_contact-form-email-message" name="email-message"rows="10"></textarea> <input class="contact-form-button contact-form-button-submit" id="ContactForm1_contact-form-submit" type="button" value="Submit" /> < br /> <div class="contact-form-error-message" id="ContactForm1_contact-form-error-message"> </div> <div class="contact-form-success-message" id="ContactForm1_contact- form-success-message"> </div> </form> </div> <script src="https://www.blogger.com/static/v1/widgets/2271878333-widgets.js" type="text /javascript"></script>/> <br /> <div class="contact-form-error-message" id="ContactForm1_contact-form-error-message"> </div> <div class="contact-form-success-message" id= "ContactForm1_contact-form-success-message"> </div> </form> </div> <script src="https://www.blogger.com/static/v1/widgets/2271878333-widgets.js" type ="text/javascript"></script>/> <br /> <div class="contact-form-error-message" id="ContactForm1_contact-form-error-message"> </div> <div class="contact-form-success-message" id= "ContactForm1_contact-form-success-message"> </div> </form> </div> <script src="https://www.blogger.com/static/v1/widgets/2271878333-widgets.js" type ="text/javascript"></script>text/javascript"></script>text/javascript"></script>